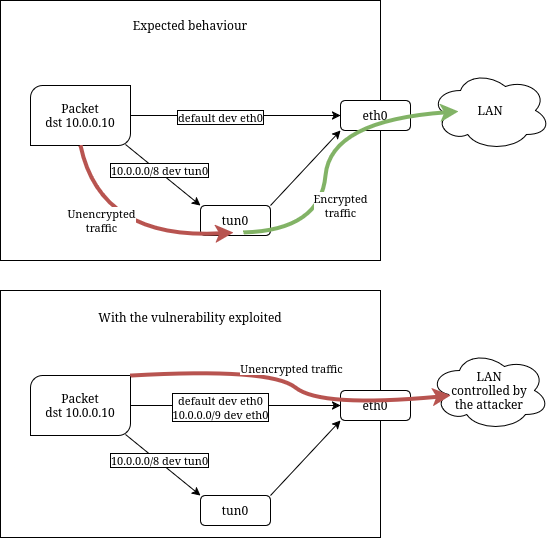
TunnelVision is a vulnerability disclosed by the researchers Dani Cronce and Lizzie Moratti, cataloged as CVE-2024-3661. It affects VPN connections when a user connects to a potentially compromised network using DHCP, and it’s trivially exploitable by a malicious agent connected to the network. Although the research only mentions DHCP, the same can happen when using IPv6 SLAAC. Attacks of similar nature exist too, like TunnelCrack.
How the attack works
Most of the VPN clients are routing-based VPNs. This kind of VPN clients creates a virtual tunnel device, normally called tun0 or similar, and encrypts all the traffic that is routed through this device before sending it to the VPN server at the other end of the tunnel.
In order to route only the right traffic through the VPN, some routes are added to the client’s system. For example:
default via 10.11.12.13 dev tun0 <-- If all traffic is routed through
                                     the VPN, use it as gateway.
10.0.0.0/8 dev tun0              <-- Resources inside the VPN network
                                     are routed through tun0.
1.2.3.4 via 192.168.1.1          <-- Traffic already encrypted is routed
                                     through the real gateway so it can be
                                     sent to the outside.
However, the DHCP protocol supports the configuration of custom routes in addition to those automatically derived from the gateway and the network mask that are almost always configured. The same is supported in SLAAC.
When 2 different routes can be applied, that with the longer prefix wins, because it is more specific. For example, a packet directed to the address 10.0.0.10 matches the routes for subnets 10.0.0.0/8 and 10.0.0.0/20, but the latter has a longer prefix so it is used.
Malicious agents with access to a compromised network can use this to install routes with longer prefixes than the VPN routes. By doing this, the attacker can make that the traffic is always directly routed through the Ethernet device, not through the tunnel device, thus effectively skipping the encryption step.
10.0.0.0/8 dev tun0   <-- route from VPN client
10.0.0.0/9 dev eth0   <-- route from DHCP
10.128.0.0/9 dev eth0 <-- route from DHCP
default dev tun0      <-- route from VPN client, default = 0.0.0.0/0
0.0.0.0/1 dev eth0    <-- route from DHCP
128.0.0.0/1 dev eth0  <-- route from DHCP

Protect with policy routing
The list of all configured routes is known as a routing table. However, for complex routing configurations, this “longer prefix wins” strategy is not enough, and that’s why the Linux kernel allows to configure more than one routing table. Then, one routing table or another is chosen depending on the configured rules or policies. This is called policy routing.
To protect from TunnelVision and similar attacks like Tunnelcrack (edit:
it protects against TunnelCrack’s LocalNet attack, not against ServerIP),
policy routing can be used in the following way:
- Add the VPN routes to a routing table other than the main one.
- Add a policy rule to check this routing table before main, by setting a higher priority.
This way, our custom table will be checked first. If any route matches, it’s used. If not, the main table is checked as usual. As the routes from DHCP are put in the main table by default, they can no longer override the VPN ones.
Note about TunnelCrack: the first version of this article claimed to protect against TunnelCrack. However, it doesn’t protect against the ServerIP variant of the attack. For this, as it relies on DNS spoofing, we believe that defining the IP of the VPN server instead of its hostname might work, but it’s not confirmed.
Configure NetworkManager
If you are managing the VPN connection with NetworkManager, you can save the policy routing configuration to the connection. NetworkManager will configure it when the connection is brought up and before any data is transmitted. The configuration is persisted so you don’t need to repeat it after a reboot.
nmcli connection list   <--  find the VPN connection name
nmcli connection modify MY_VPN_CONNECTION_NAME \
    ipv4.route-table 75 \
    ipv4.routing-rules "priority 32000 from all table 75" \
    ipv6.route-table 75 \
    ipv6.routing-rules "priority 32000 from all table 75"
nmcli connection down MY_VPN_CONNECTION_NAME
nmcli connection up MY_VPN_CONNECTION_NAME
These are pretty advanced configurations, thus normally not available in your desktop’s GUI settings panel.
The table number must not be 253-255, reserved for the default kernel tables,
and the priority can be any number lower than the priority of the rule for
the main table, which is 32766 (lower number means higher priority).
See man ip-rule for more details.
Due to a bug in NetworkManager, these settings were partially ignored for VPN connections. It is fixed since the latest development version 1.51.6. It is also fixed in the stable versions 1.50.2 and 1.48.16. For other versions, please check the changelog of your distribution’s NetworkManager package to find out if it has been patched.
Possible side effects
Unexpected effects might happen for those using the VPN to route all the traffic,
i.e. those that have disabled the option “use only for resources in this connection”
(called never-default in nmcli).
With the above’s configuration, absolutely all the traffic is routed through
the VPN, including, for example, the traffic directed to the local network,
that will stop working. This is because a default route like default via VPN_ADDRESS
is added to the new table with higher priority, so routes to the local network
in the main table like 192.168.1.0/24 dev eth0 don’t take effect.
Captive portals like those used to login to hotels’ WiFi network won’t work, either.
If you need this to work, disabling this configuration is needed, or manually adding
the right routes to the new table, if you know how to do it.
Additionally, any other NetworkManager connection that also needs to add routes might
stop working as well, and you will need to tweak its routing-rules properties to create
a rule with higher priority than the other.
In exchange, this is a very robust configuration that should protect you from any data leak based on these kinds of routing attacks.